How do you create your Shopify store from start to finish?
This guide follows the real order of a first store: prepare, sign up, fill the store, set up selling, test, then open to the public. Plan on a day of work, spread over the free trial.
The essentials in 30 seconds
- Prepare everything before you sign up
- Start the free trial
- Find your way around the admin
- Add your first product
- Set price, inventory, weight and variants
- Choose and customize your theme
- Organize the store menus
- Set up shipping and delivery
- Check your taxes
- Turn on payments
- Choose your customers' payment methods
- Write your policies
- Create a welcome code
- Place a test order
- Choose a plan
- Connect your domain name
- Open the store to the public
- Attract your first customers
Avoid: Spending the free trial tweaking details without adding a single product.
See the details with screenshots ↓Step by step
Screenshots show the interface used in the original guide (Shopify in French, Leadpages in English). In your account, buttons appear in your language.
- 1
Prepare everything before you sign up
The free trial is short: prepare your content before you create the account, so you spend that time building rather than searching.
Gather: the store name, a logo (even a simple one), 3 to 5 products with photos, a price and a description for each, package weight and size if you ship physical items, and your business details (EIN if you have one).
Have the bank account that will receive your sales ready too: Shopify asks for it to turn on payments. Finally, write down what you want in your return policy: how many days, refund or exchange, who pays return shipping.
- 2
Start the free trial
On shopify.com, open the Pricing page. It shows the current offer: a free trial, often followed by a discounted launch price for the first months. Offers change often and depend on your country: read today's offer before you start.
Click « Start free trial », enter your email and answer the questions about your project. Your answers only help set up the admin: you can change everything later.
Put two dates in your calendar right away: the end of the free trial, and the end of the launch offer, when the regular plan price starts.

- 3
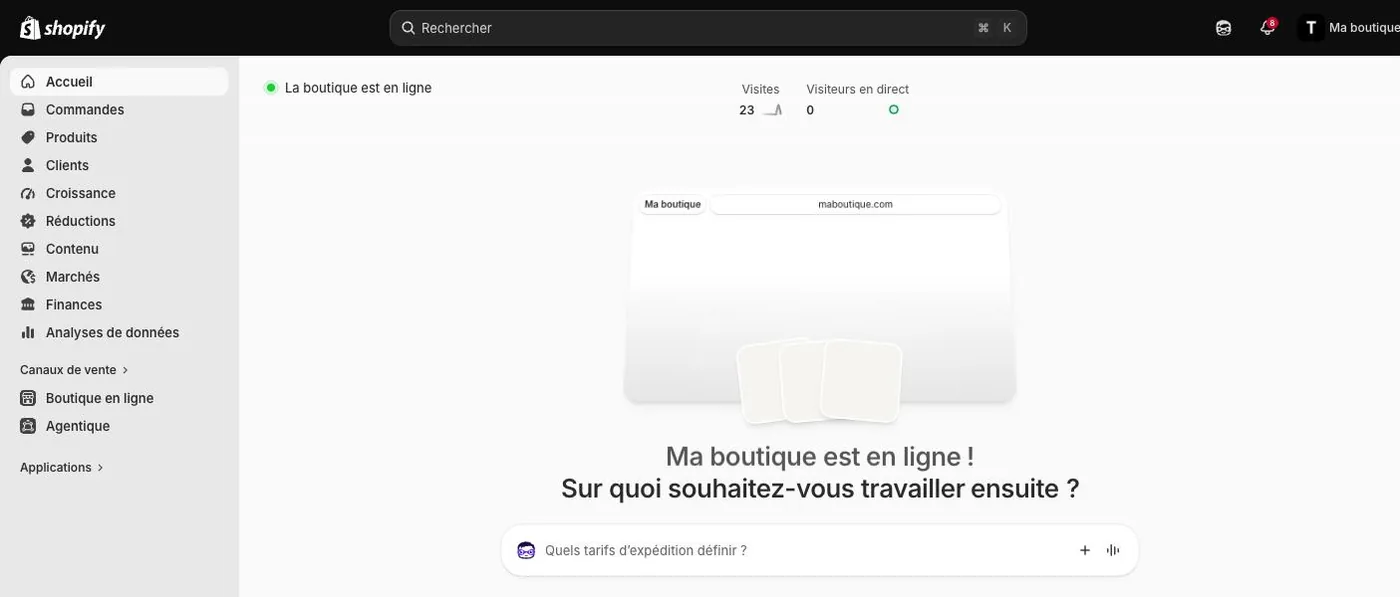
Find your way around the admin
Everything happens in the Shopify admin. The left menu groups the sections you'll use every day: « Orders », « Products », « Customers », « Discounts », « Content » and « Online Store ». Store settings are all in « Settings », at the bottom left.
In the middle of the home page, a bar lets you ask Sidekick, Shopify's AI assistant, a question. It knows your store: ask it, for example, « How do I offer free shipping over $50? ». Still, check its answers against the official help center before changing an important setting.
- 4
Add your first product
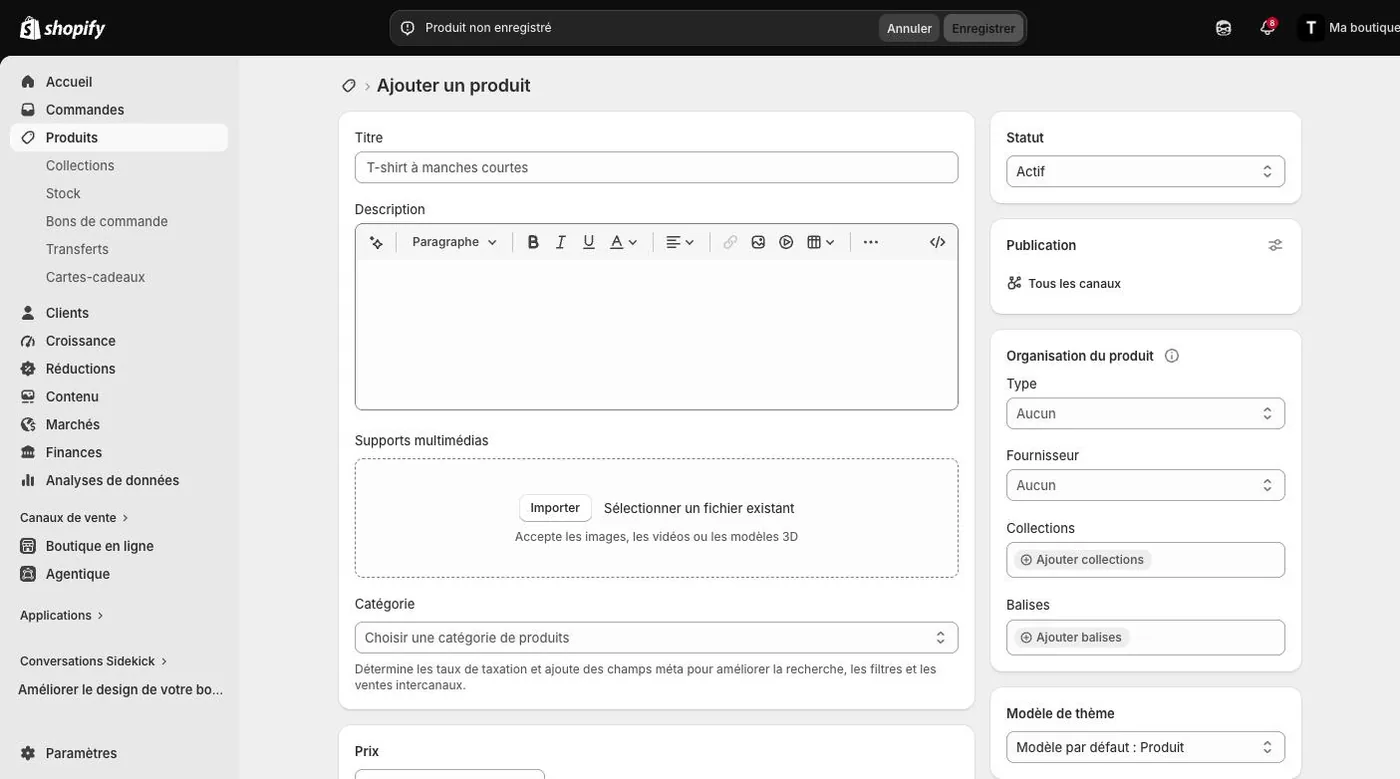
Click « Products », then « Add product ». Write a clear title, the way a customer would search for it on Google: « Bauhaus Poster 11x17 » rather than « Model 12 ».
The description answers the buyer's questions: what it is, the material, the size, how to use it, shipping time. Short sentences and a bullet list read better on a phone.
In « Media », click « Upload » and add several photos: the product alone on a light background, then in use. Keep the same format for every photo in the store: that's what makes it look professional.
- 5
Set price, inventory, weight and variants
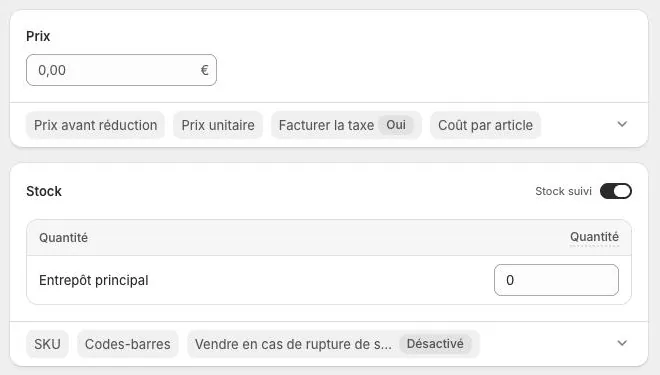
In « Pricing », enter the selling price. The « Compare-at price » field shows a crossed-out price: only use it for a real sale.
In « Inventory », enter the quantity available so Shopify stops selling when you run out. For an item you ship, enter the weight including packaging: it's used to calculate shipping. For a downloadable file, turn off « Physical product ».
If the product comes in several sizes or colors, add variants: each one can have its own price, inventory and photo. Finally, set the status to « Active » and click « Save ». Repeat for your other products.
- 6
Choose and customize your theme
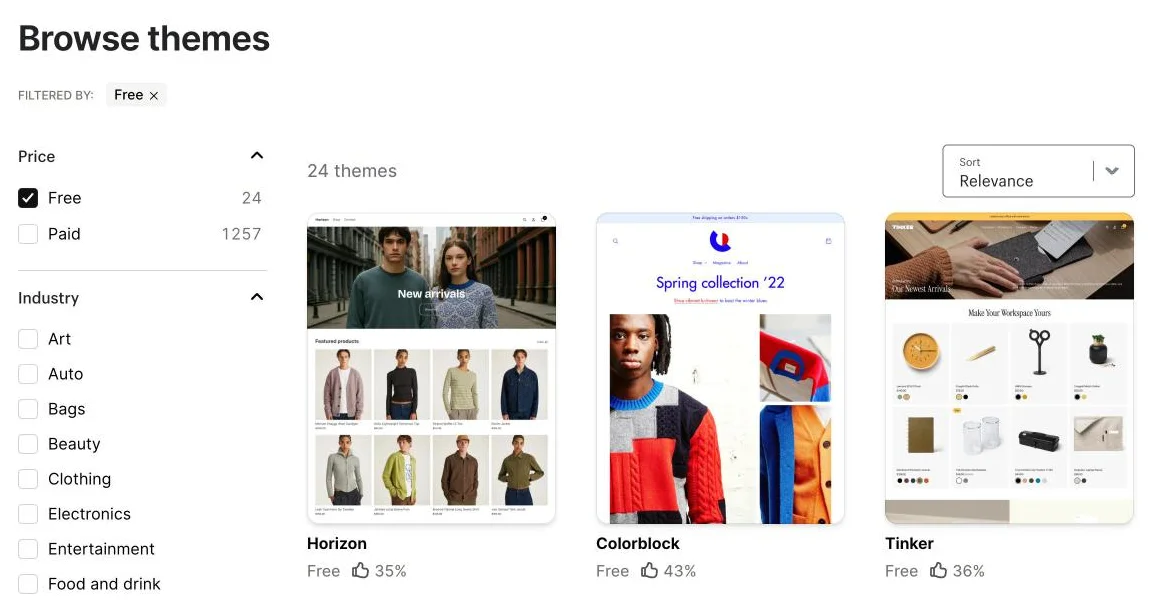
The theme decides how the whole store looks. In « Online Store », then « Themes », or on themes.shopify.com, filter for free themes: they're built and updated by Shopify and more than enough to start.
Choose a theme for the way it shows products, not for its demo photos. Click « Add »: the theme goes into your library without replacing the one that's live.
Click « Customize » to add your logo, colors and fonts and to arrange the home page: a large image, your featured products, a line that says what you sell. Always check the mobile preview, then click « Publish ».
- 7
Organize the store menus
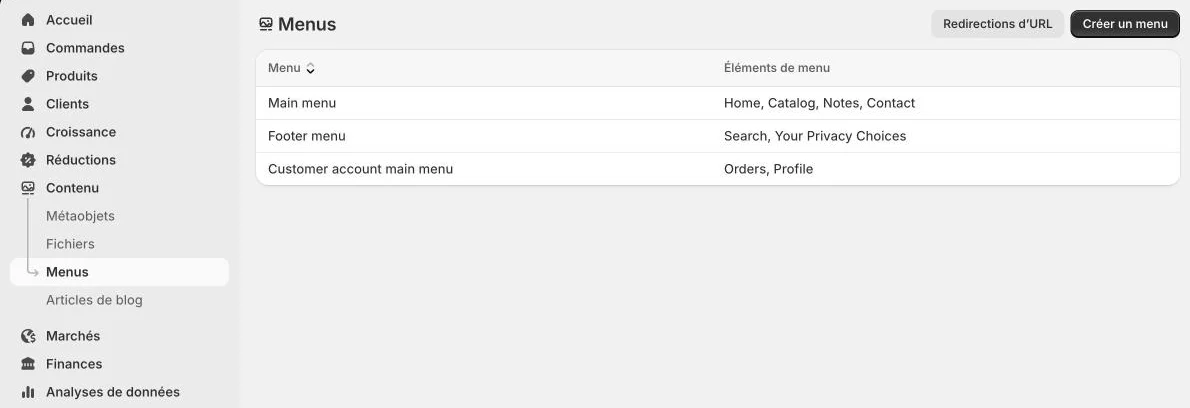
Menus link your pages together. Open « Content », then « Menus ». Two menus already exist: the main menu, at the top of the store, and the footer menu.
In the main menu, keep few entries: home, the catalog or your collections, and a contact page. In the footer, put the practical pages: shipping, returns, terms of sale, legal notice.
Click a menu to add, rename or drag and drop an item, then save.
- 8
Set up shipping and delivery
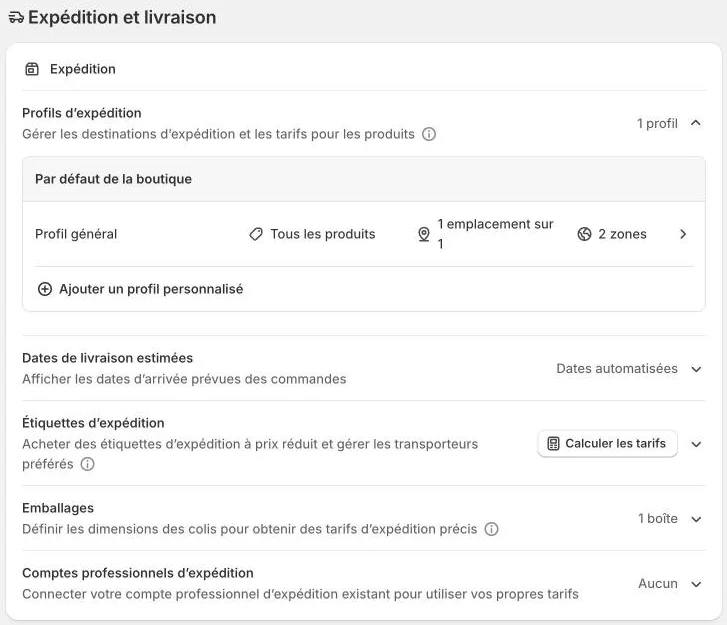
Click « Settings », then « Shipping and delivery ». The « General profile » applies to all your products: open it to see your shipping zones (for example the United States, then the rest of the world) and the rates for each zone.
For each zone, create simple rates: a flat price, or a price based on order weight. A « Free shipping » rate above a certain amount often nudges customers to add one more item.
In « Packages », enter the dimensions of your usual box: Shopify uses them to estimate shipping costs. If you only sell digital products, you don't need a shipping rate.
- 9
Check your taxes
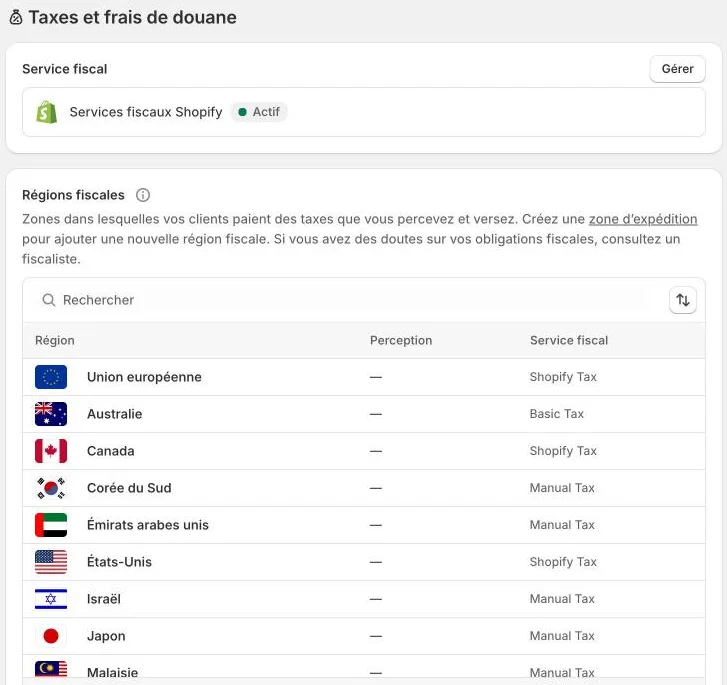
In « Settings », open « Taxes and duties ». Shopify Tax calculates sales tax automatically based on where the customer is, in the regions where you're set up to collect.
In the United States, you generally collect sales tax in states where you have nexus (a physical presence or enough sales there). Check that the right states are listed, and register with each state before collecting.
Shopify says it on this screen itself: if you're unsure about your tax obligations, talk to an accountant or tax professional before opening the store.
- 10
Turn on payments
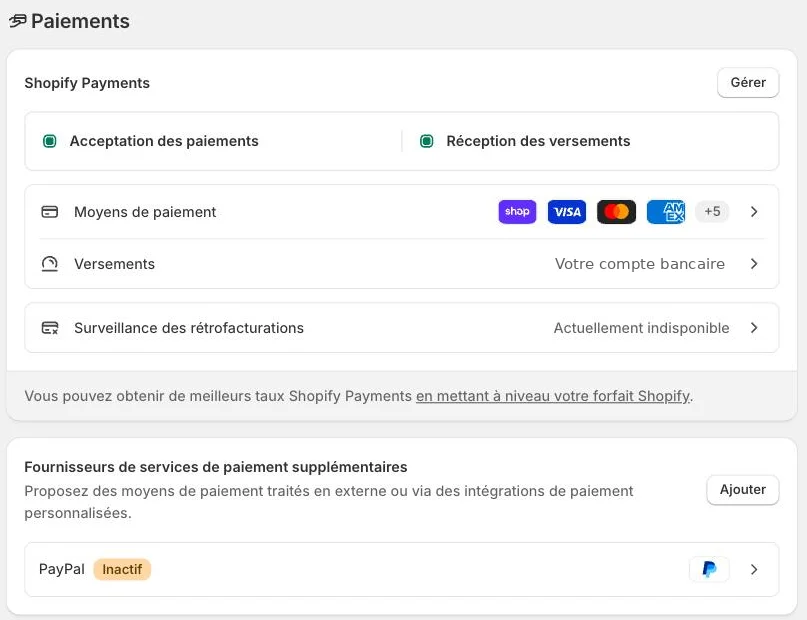
In « Settings », then « Payments », turn on Shopify Payments. Shopify asks for details about your business and the bank account that will receive payouts. Two-step authentication is required.
With Shopify Payments, you accept cards and local payment methods without an outside provider. Card rates depend on your plan: check them on shopify.com/pricing. If you use another provider instead, Shopify adds transaction fees.
PayPal can be added under « Supported payment methods » or « Additional payment methods ».
- 11
Choose your customers' payment methods
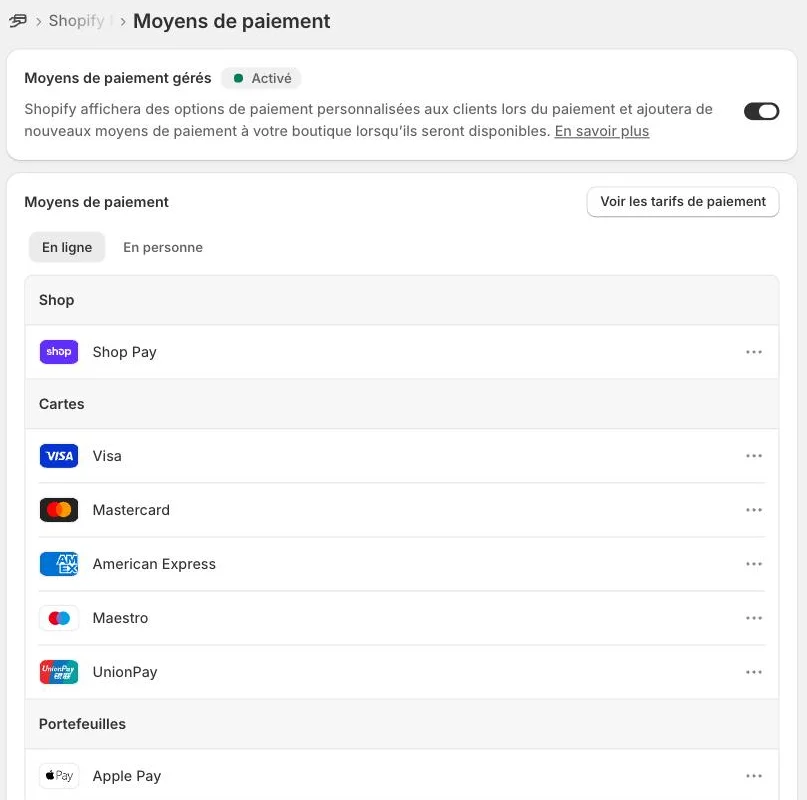
Still in « Payments », open the payment methods. Turn on the ones your customers really use: Visa and Mastercard, American Express, Apple Pay, Google Pay and Shop Pay.
The button to view payment rates shows the fees for each method: some cost more than others. There's no need to turn everything on; too many logos can even confuse buyers at checkout.
- 12
Write your policies
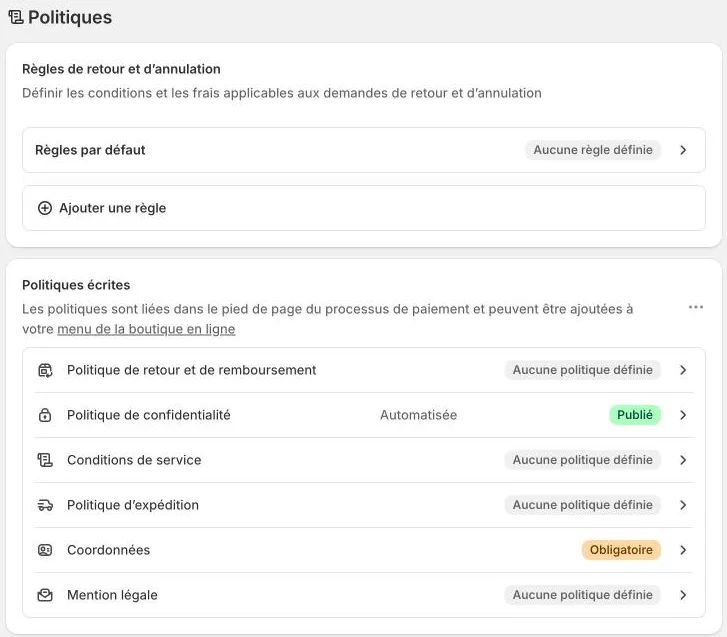
In « Settings », open « Policies ». Written policies appear in the checkout footer: customers see them before they buy.
At a minimum, fill in the return and refund policy, terms of service, shipping policy and privacy policy. « Contact information » is marked required: it's what lets customers reach you.
If Shopify offers a template, start from it, but adapt it to how you really work. US law doesn't set a single return period for online purchases, so state your own window clearly (30 days is common). Then add these pages to the footer menu.
- 13
Create a welcome code
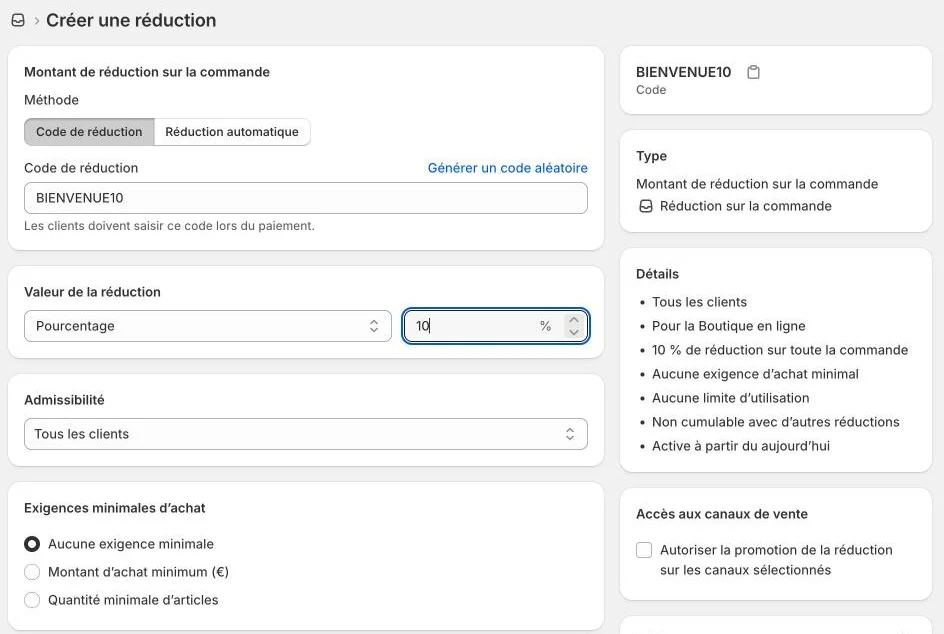
A small discount helps trigger the first order. Click « Discounts », then « Create discount » and choose « Amount off order ».
Type an easy-to-remember code, like WELCOME10, then the value: 10% for example. Under « Maximum discount uses », check the one-use-per-customer limit, or the code works on every order. Save: the code works at checkout right away.
You'll also use this code on your promo pages and social media.
- 14
Place a test order
Before opening, buy from your own store like a real customer: on your phone, going through the home page, a product, the cart and checkout, with your discount code.
Check at each step: is shipping right? Does sales tax show correctly? Does the confirmation email arrive, and does it make you want to come back? You can place a real order with your card, then cancel and refund it from « Orders ».
Fix anything that made you hesitate: if you hesitated, your customers will too.
- 15
Choose a plan
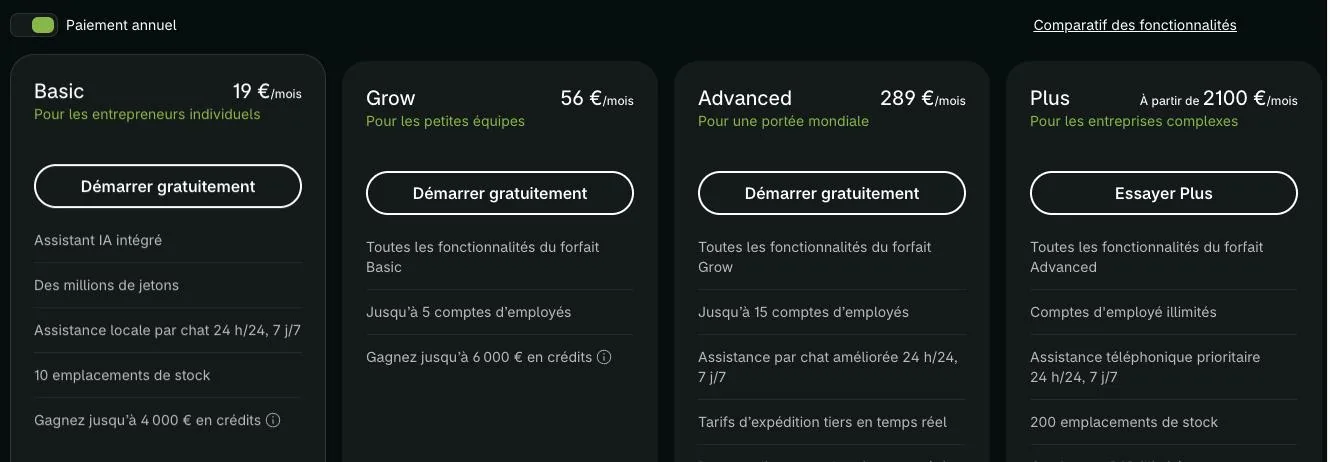
To keep the store after the trial, choose a plan in « Settings », then « Plan ». For a solo seller, Basic is almost always enough. Check the current US prices, monthly and yearly, on shopify.com/pricing.
If there's a launch offer, it applies for the first months, then the regular price starts. Grow and Advanced are mostly for teams and high volumes: you can change plans later, when your sales justify it.
Remember that paid apps come on top of the plan price.
- 16
Connect your domain name
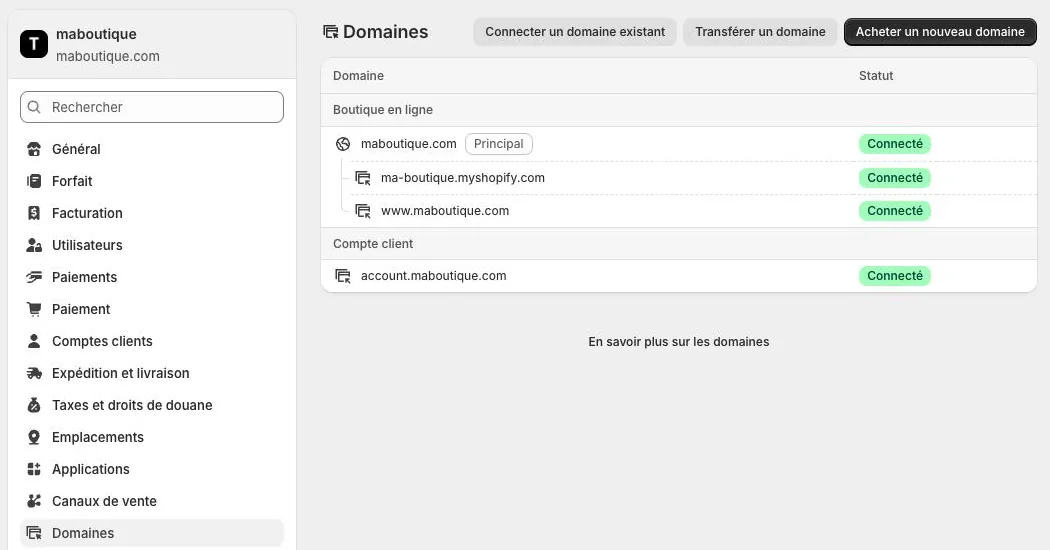
Your store already has a free .myshopify.com address, but your own domain looks more trustworthy. In « Settings », then « Domains », choose to connect an existing domain, transfer a domain or buy a new one.
With many domain providers, Shopify connects it automatically. Otherwise, it tells you which DNS records to change at your provider. Connecting often takes less than two hours, sometimes up to two days. The HTTPS certificate is free.
If several domains are connected, choose the one customers will see as « Primary ».
- 17
Open the store to the public
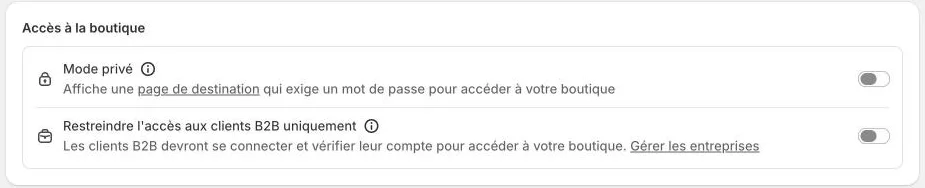
While the store is being set up, it's password protected. To open it, go to « Online Store », then « Preferences ». Under store access, turn off password protection: the store becomes visible to everyone.
On the same page, fill in the home page title and meta description: that's what Google and social networks show when someone shares your store.
The admin home page then shows that the store is live, with live visit and visitor counts.
- 18
Attract your first customers
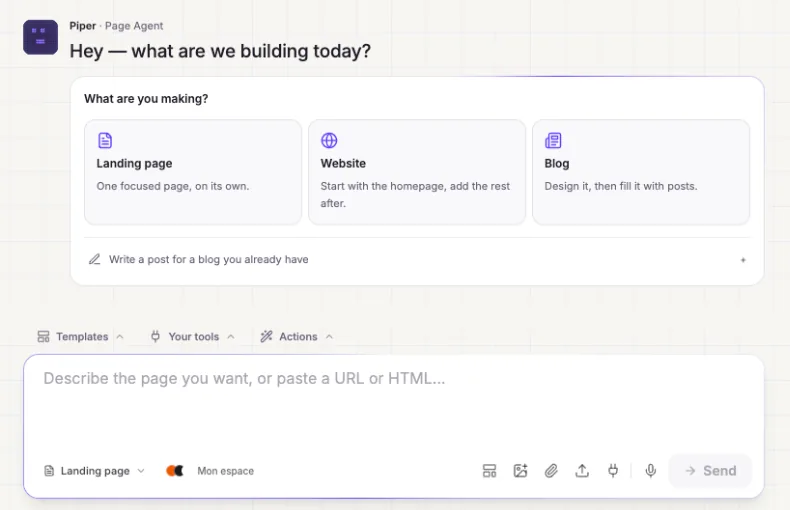
An online store doesn't get visits on its own. Pick a hero product and an offer (your welcome code), then create a landing page that only talks about that offer, with HTML Pub or Leadpages.
Share that page's address on social media, in your bio, on Pinterest or in your ads. The page button goes straight to the Shopify product page, not the store home page.
Every week, look at how many visitors arrive and how many buy, and improve the page that converts least. The quick guide « get customers with a landing page » covers this step in detail.
Try it yourself
Shopify starts free, then has a discounted launch offer. You can set everything up before paying.
Try Shopify ↗Affiliate link: it does not change the price for you.
Common mistakes
- Spending the free trial tweaking details without adding a single product.
- Opening the store without a test order: the customer is the one who finds the wrong shipping rates.
- Leaving policies empty: returns, terms and contact details reassure buyers at checkout.
- Forgetting that the regular plan price starts after the launch offer.
- Filling the main menu with dozens of links: visitors no longer know where to click.
Official sources
Get the next guides
New Leadpages, HTML Pub and Shopify guides by email, every two weeks. No spam, unsubscribe in one click.